
Hey everyone! In this series of tutorials, I will be explaining to you about Texas Instrument’s c2000 Piccolo line of microcontrollers. The first tutorial is an introduction to the board itself, the pins, power supply and a bit about the architecture of the c2000 chip.
Texas Instrument’s markets the c2000 Piccolo Launchpad, as a DSP, or a digital signal processor instead of a microcontroller. A DSP is used more as filters or as measurement devices for audio and video signals. This means that it has to be faster and more versatile than standard microcontrollers like Arduino’s. And the Piccolo delivers! The board has 12 PWM channels that can provide high-resolution signals and maintain it for long durations. It also has 40 pins that can be individually programmed along with buttons and an on-chip temperature sensor and LEDs. All this and many more features makes the Piccolo a versatile and robust controller for almost any application.
Note: For this and the subsequent tutorials, I will be using the c2000 Piccolo Launchpad LAUNCHXL-F28027.
The Board
Power – The device can be powered either from a computer through the USB  connection, or power can be given using the jumpers J1, J2 and J3. To allow for JTAG isolation, jumper J1 must be given 3.3V, jumper J2 is ground and Jumper J3 is 5V.
USB – The F28027 has a USB mini-B type adapter built in. The adapter can be used to power the board, program it and send serial data to your computer while developing or debugging your code. To do this, the USB connection goes to an onboard UART adapter. This connection is enabled only when the switch S4 is in the up position.
Switch S4 – If someone wishes to connect a booster pack or an LED screen to the board, then there will be a contention between the UART adapter on the board and the booster packs which use serial communication. To solve this issue, when the switch S4 is kept in the down position, the USB gets disconnected from the UART and is directly connected to booster packs that are connected to the board. To put it simply, when developing, if you are connecting the board to your laptop, make sure that the switch S4 is up, and if you are interfacing some other device, make sure that it is down.
Boot Selection Switch – The board has an onboard ROM from which you can select different ways to boot up your device. The three switches on S1 are used to configure this. When switch 3 is in down position, then the debugger does not work.
Buttons – There are two buttons present on the board. One button (GPIO12) can be programmed to perform functions. The other button is a CPU reset button that can be used to reset the board.
Pins –
There are 40 pins on the board. Among those, the pins on J1, J2 and J6 are the GPIO pins  that can be used for sending and receiving digital signals. The pins on J5 are the ADC pins. Among the J5 pins, the pin 1 gives a +5V output and pin 2 is ground. The GPIO pins can give both Input and Output as digital signals. A high signal will drive the pin up to a voltage of 3.3 V. The ADCIN pins, on the other hand, can take analog Inputs. There are also three other pins from which you can get an output voltage of +3.3V and two grounds. A more detailed description of the pins can be found in the table.
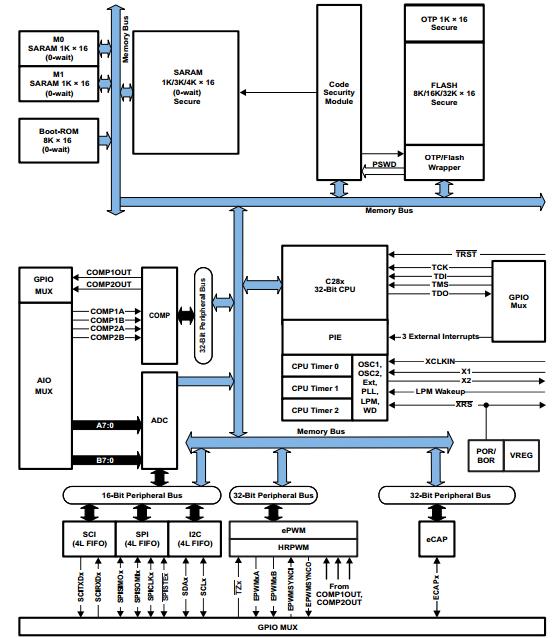
Chip – The TMS320f28027 is the heart of the board. It is a 32 bit CPU with a three clock speeds of 60MHz, 50MHz and 40MHz. It requires a power supply of 3.3V and has 22 individually programmable GPIO pins. The chip also has an onboard temperature sensor. The architecture of the board is shown below.
The next tutorial will be about how to start developing on the board and use the onboard temperature sensor to measure the room temperature.
That’s all folks!

hello, i’m working on this launchpad c2000 card, my work will consist of PIL and SIL approaches for the validation of a photovoltaic production site, such that I have to found an MPPT command based on this launchpad card to optimize the performance of this site photovoltaic. My request is to take more advantage of this card and to know how to implement it in my process
LikeLike